Introduction
Stone cladding has transformed modern architecture, offering the timeless appeal of natural stone without structural complications. However, many homeowners and contractors struggle with proper installation techniques, leading to premature failure and costly repairs. Stacked stone cladding, while beautiful, requires specific knowledge and techniques to install correctly. This comprehensive guide will walk you through every step of the stone cladding process, helping you achieve professional results that will last for decades.
What is Stacked Stone Cladding?
Stacked stone cladding refers to thin sections of natural or manufactured stone applied to wall surfaces for decorative purposes. Unlike traditional stonework, cladding doesn’t provide structural support but instead offers aesthetic benefits while protecting the underlying structure.
Types of Stone Cladding Materials
When planning your stacked stone cladding project, selecting the right material is crucial for both aesthetic appeal and long-term durability.
| Stone Type | Characteristics | Best Used For | Average Cost (per sq. ft.) |
| Natural Stone | Authentic look, unique variations, weather-resistant | Exterior facades, feature walls | $15-$30 |
| Manufactured Stone | Lighter weight, consistent coloring, less expensive | Interior walls, DIY projects | $8-$20 |
| Limestone | Soft appearance, neutral colors, traditional look | Classic designs, warm climate regions | $12-$25 |
| Slate | Dramatic textures, dark tones, water-resistant | Modern designs, wet areas | $17-$28 |
| Quartzite | Highly durable, crystalline appearance, low maintenance | High-traffic areas, harsh climates | $20-$35 |
| Sandstone | Warm colors, natural variations, textured surface | Desert-inspired designs, dry climates | $13-$22 |
Benefits of Stacked Stone Cladding
- Aesthetic Appeal: Creates a dramatic visual impact with natural texture and dimension
- Increased Property Value: Enhances curb appeal and architectural interest
- Durability: Withstands harsh weather conditions when properly installed
- Low Maintenance: Requires minimal upkeep compared to other wall finishes
- Thermal Insulation: Provides additional insulation to improve energy efficiency
- Design Versatility: Works with virtually any architectural style from rustic to contemporary
Essential Tools and Materials for Laying Stacked Stone Cladding
Tools Needed
Before beginning your stacked stone cladding project, assemble these essential tools:
- Measuring Tools:
- Tape measure
- Level (4-foot recommended)
- Chalk line
- Square
- Cutting Tools:
- Wet saw with diamond blade
- Angle grinder with masonry disc
- Stone chisel and hammer (for detailed cutting)
- Safety glasses and ear protection
- Application Tools:
- Notched trowel (½-inch square notch)
- Margin trowel
- Pointing trowel
- Mason’s hammer
- Grout bag (if mortar joints are desired)
- Rubber mallet
- Wire brush
- Mixing Tools:
- Mixing bucket
- Drill with mixing paddle
- Wheelbarrow (for larger projects)
Materials Required
Gather these materials based on your project size:
- Stone Cladding Panels or Individual Stones:
- Calculate square footage needed plus 10% for cuts and waste
- Substrate Materials (if needed):
- Cement backer board
- Weather-resistant barrier
- Metal lath (galvanized or stainless steel)
- Screws or nails appropriate for your backing material
- Adhesives and Mortars:
- Modified thinset mortar
- Type S mortar mix
- Polymer-modified mortar for exterior applications
- Finishing Materials:
- Sealer (appropriate for your stone type)
- Caulk for expansion joints
- Cleaning solution (appropriate for stone type)
How to Lay Stacked Stone Cladding: Step-by-Step Process
Step 1: Preparation and Planning
Surface Assessment
Before installing stacked stone cladding, thoroughly evaluate your installation surface:
- Check for structural integrity: The wall must be capable of supporting the weight of stone cladding (typically 10-15 pounds per square foot).
- Ensure surface is clean: Remove any dirt, dust, old paint, or loose material.
- Address moisture issues: Fix any water penetration problems before installation begins.
- Evaluate flatness: Surface should be within ¼-inch of flat over a 10-foot span.
Project Planning
- Create a layout plan: Sketch your wall and determine the stone pattern. Consider:
- Starting point (usually bottom and working up)
- Corner treatments
- How to handle openings (windows, doors)
- Electrical outlets and switches
- Calculate materials: Measure total square footage and add 10-15% for cuts and waste.
- Acclimate materials: Allow stone to adjust to installation environment for at least 24 hours.
Step 2: Preparing the Wall Surface
Different base materials require specific preparation techniques:
For Wood Frame Walls (Exterior)
- Install weather-resistant barrier (building paper or house wrap)
- Apply metal lath, overlapping seams by at least 2 inches
- Secure lath with galvanized nails or screws every 6 inches
- Apply scratch coat of mortar approximately ½-inch thick
- Create horizontal grooves in scratch coat with notched trowel
- Allow scratch coat to cure for 24-48 hours
For Masonry Walls (Brick, Concrete, Block)
- Inspect for cracks or deterioration and repair as needed
- Clean surface thoroughly to remove any dirt or debris
- For smooth surfaces, create texture by:
- Applying a bonding agent, or
- Installing metal lath secured with masonry anchors
- For rough, sound surfaces, stone may be applied directly
For Interior Drywall
- Verify wall can support weight (may need additional studs)
- For dry areas, cement backer board can be applied directly
- For wet areas, install moisture barrier before backer board
- Secure backer board with screws at 8-inch intervals
- Tape and mud joints with thinset and alkaline-resistant mesh tape
Step 3: Planning Your Layout
Proper layout planning ensures an attractive, balanced installation:
- Measure and mark: Use level and chalk lines to mark reference lines on your wall.
- Dry lay stones: Arrange stones on the floor to plan pattern and color distribution. This helps:
- Ensure natural-looking color variation
- Plan cuts for corners and edges
- Identify stones that need reshaping
- Plan for corners first: If your project includes corners, begin planning with these areas since they’re most visible.
- Balance stone sizes: Mix large and small pieces throughout for a natural appearance.
- Consider joint widths: Decide whether you want dry-stack (minimal joint) or visible mortar joints.
Step 4: Mixing Mortar or Adhesive
Proper mortar consistency is crucial for successful stone cladding:
- Follow manufacturer instructions: Different products have specific mixing ratios.
- Mix in small batches: Only prepare what you can use within 1-2 hours.
- Achieve proper consistency: The mortar should hold its shape when troweled but remain workable—similar to peanut butter.
- Let mortar slake: After initial mixing, let stand for 5-10 minutes, then remix briefly before use.
- Safety precautions: Wear gloves and eye protection when mixing mortar to prevent chemical burns.
Step 5: Installing Corner Pieces (If Applicable)
If your project includes corners, begin installation here:
- Start at the bottom: Install corner pieces first, working from bottom to top.
- Apply mortar: Using the notched trowel, apply mortar to both the wall and back of stone (back-buttering method).
- Press firmly: Set corner piece in place with firm pressure, twisting slightly for better adhesion.
- Check level and alignment: Use level to ensure proper positioning.
- Alternate long and short sides: For outside corners, alternate orientation of corner pieces for a natural interlocked appearance.
- Allow for setting time: Let corner pieces set for several hours before installing adjacent field stones.
Step 6: Installing Field Stones
After corners are established, proceed with the main wall area:
- Begin at the bottom: Work from bottom to top to avoid mortar drips on finished stones.
- Apply mortar to wall: Using the notched trowel, apply mortar to a small section (2-3 square feet).
- Back-butter stones: Apply a thin layer of mortar to the back of each stone.
- Press and wiggle: Place stone onto wall with firm pressure and slight wiggling motion to ensure full contact.
- Maintain consistent joints: Keep uniform spacing between stones if desired.
- Check periodically with level: Verify horizontal lines remain level as you progress.
- Clean excess mortar: Remove any mortar on stone faces immediately before it hardens.
- Vary stone patterns: Avoid obvious repeating patterns or straight vertical lines.
Step 7: Cutting and Fitting Stones
Custom cuts are often needed around edges, outlets, and windows:
- Mark cutting lines: Use pencil or chalk to mark stones for cutting.
- Use appropriate cutting tools:
- Wet saw for straight, precise cuts
- Angle grinder for rough shaping
- Chisel and hammer for small adjustments
- Safety first: Always wear eye protection, hearing protection, and dust mask when cutting stone.
- Cut in ventilated area: Stone dust can be hazardous when inhaled.
- Check fit before applying mortar: Dry-fit cut pieces before final installation.
- Address visible cut edges: Position cut edges where they’ll be least noticeable, or use techniques to disguise them:
- Facing cut edges downward
- Using smaller stones to hide cut edges
- Applying colored mortar to blend cut edges
Step 8: Grouting (If Desired)
For installations with visible mortar joints:
- Allow adequate setting time: Wait at least 24 hours after stone installation.
- Prepare grout mixture: Mix to slightly wetter consistency than installation mortar.
- Fill grout bag: Load grout mixture into grout bag for controlled application.
- Apply consistently: Squeeze grout into joints with even pressure.
- Tool joints: After grout becomes thumb-print firm (30-60 minutes), use jointing tool to compact and shape.
- Clean excess: Remove any grout smears from stone faces with damp sponge.
Step 9: Cleaning and Sealing
Proper cleaning and sealing protect your investment:
- Initial cleaning: After installation is complete and mortar has cured (approximately 72 hours):
- Remove dust with soft brush
- Clean stone according to manufacturer recommendations
- Avoid acidic cleaners on limestone or other acid-sensitive stones
- Sealing considerations:
- Interior installations often don’t require sealing
- Exterior or wet-area installations benefit from appropriate sealers
- Choose breathable sealers that won’t trap moisture
- Test sealer on inconspicuous area first
- Apply according to manufacturer instructions, typically 2-3 light coats
- Final inspection: After cleaning, check entire installation for:
- Loose stones
- Gap filling needs
- Consistent appearance
Advanced Techniques for Laying Stacked Stone Cladding
Creating Feature Patterns
Enhance your stacked stone cladding with decorative patterns:
- Horizontal banding: Incorporate contrasting stone colors in horizontal bands.
- Random vs. coursed patterns:
- Random: Varying heights and lengths for rustic look
- Coursed: Stones of similar height in each row for formal appearance
- Mixed materials: Combine stone with other materials like wood or metal for contemporary appeal.
- Accent stones: Incorporate specialty stones at key locations for visual interest.
Addressing Special Situations
Installing Around Windows and Doors
- Plan cuts carefully: Measure openings precisely before cutting stones.
- Consider trim options:
- Custom stone sills and lintels
- Complementary wood or metal trim
- Purpose-made stone trim pieces
- Maintain expansion allowance: Leave 1/4-inch gap between stone and window/door frames, fill with appropriate caulk.
Handling Electrical Outlets and Switches
- Plan ahead: Consider extending electrical boxes before installation.
- Use box extenders: Install electrical box extenders to bring outlets flush with final stone surface.
- Custom cuts: Create precise cuts around outlets using template and proper cutting tools.
- Special cover plates: Consider decorative cover plates designed for stone installations.
Exterior Corners and Transitions
- Use manufactured corner pieces: These provide finished appearance on both visible sides.
- Create mitered corners: For custom applications, cut stones at 45-degree angles and join at corner.
- Transition details: Where stone meets other materials, consider:
- Metal edging for clean lines
- Gradually tapering stone thickness
- Decorative trim pieces
Working with Different Stone Shapes
Irregular Shapes (Fieldstone Style)
- Puzzle piece approach: Fit stones together like a puzzle, rotating to find best fit.
- Varying joint widths: Allow for wider and narrower joints as needed.
- Strategic small stones: Use smaller pieces to fill awkward gaps.
Uniform Shapes (Ashlar or Linear Style)
- Maintain consistent horizontal lines: Use level frequently.
- Stagger vertical joints: Avoid aligning vertical joints between rows.
- Plan full pattern: Map out several rows at once for balanced appearance.
Common Mistakes When Laying Stacked Stone Cladding and How to Avoid Them
Preparation Errors
- Inadequate wall preparation:
- Problem: Skip proper wall prep, leading to adhesion failure
- Solution: Always assess wall condition and install appropriate substrate
- Insufficient structural support:
- Problem: Installing heavy stone on inadequate structure
- Solution: Consult building codes and add structural support as needed
- Ignoring moisture barriers:
- Problem: Water infiltration leading to mold and stone failure
- Solution: Always install appropriate moisture protection for your climate and situation
Installation Mistakes
- Visible patterns or “stacking”:
- Problem: Repeated stone sizes creating obvious lines
- Solution: Mix stone sizes and stagger joints carefully
- Inadequate mortar coverage:
- Problem: Stones adhered with insufficient mortar
- Solution: Use back-buttering method and check for 100% coverage
- Poor color distribution:
- Problem: Clumping similar colors together
- Solution: Mix stones from different boxes and plan distribution in advance
- Incorrect mortar consistency:
- Problem: Too wet or too dry mortar leading to failure
- Solution: Follow manufacturer guidelines and adjust as needed for climate conditions
Finishing Errors
- Rushing the process:
- Problem: Not allowing proper curing time between steps
- Solution: Follow recommended waiting periods even if it extends project timeline
- Using wrong cleaning products:
- Problem: Damage to stone surface from harsh chemicals
- Solution: Use only cleaners recommended for your specific stone type
- Over-sealing:
- Problem: Trapping moisture by using non-breathable sealers
- Solution: Choose appropriate breathable sealers and apply correctly
Maintenance and Care for Stacked Stone Cladding
Routine Maintenance
Keep your stone cladding looking beautiful with these care tips:
- Regular cleaning:
- Dust interior installations periodically with soft brush
- Clean exterior installations annually with gentle pressure washing
- Remove plant growth or debris promptly
- Inspect for issues:
- Check for loose stones biannually
- Look for cracked mortar or caulking
- Watch for water staining or efflorescence (white mineral deposits)
- Address problems quickly:
- Repair loose stones before more become compromised
- Replace cracked mortar to prevent water infiltration
- Clean efflorescence with appropriate stone-safe products
Long-Term Protection
- Resealing:
- Exterior installations typically need resealing every 3-5 years
- Follow manufacturer recommendations for specific products
- Clean thoroughly before applying new sealer
- Weather protection:
- Ensure proper flashing above stone installations
- Maintain gutters and downspouts to prevent excessive water exposure
- In freezing climates, avoid de-icing chemicals near stone installations
- Repair techniques:
- Keep extra stones for potential replacements
- Document mortar color formula for future repairs
- Address small issues before they become major problems
Cost Considerations for Stacked Stone Cladding Projects
Budget Planning
Understanding the financial aspects of stone cladding installation:
Material Costs Breakdown
| Component | Average Cost (per sq. ft.) | Notes |
| Natural Stone | $15-$30 | Varies by stone type and quality |
| Manufactured Stone | $8-$20 | More consistent pricing |
| Corner Pieces | $20-$40 per linear ft. | Specialty pieces cost more |
| Mortar & Adhesives | $0.50-$2 | Depending on quality and type |
| Substrate Materials | $1-$3 | Includes backer board, lath, etc. |
| Sealers | $0.30-$1 | Based on coverage rates |
Labor Cost Factors
If hiring professionals, consider these cost variables:
- Installation complexity: Simple walls vs. complex designs with many cuts
- Accessibility: Ground level vs. elevated installations
- Geographic location: Labor rates vary significantly by region
- Contractor experience: Specialists often charge more but deliver better results
- Project size: Larger projects may qualify for reduced square footage rates
DIY vs. Professional Installation
| Aspect | DIY | Professional |
| Cost | Materials only ($9-$35/sq. ft.) | Materials + labor ($20-$60/sq. ft.) |
| Time | 2-4 times longer than professional | Typically 1-3 days for average wall |
| Equipment | Must purchase or rent specialized tools | Included in service |
| Quality | Depends on skill level | Consistent, guaranteed results |
| Warranty | Material warranties only | Often includes installation warranty |
| Learning Curve | Significant for first-time installers | None – leveraging expertise |
Value-Adding Aspects
Properly installed stone cladding typically offers:
- ROI (Return on Investment): 80-95% of costs often recouped in home value
- Energy savings: Additional insulation layer can reduce heating/cooling costs
- Reduced maintenance: Less frequent repainting or repair compared to other finishes
- Longevity: 50+ years with proper installation and maintenance
Environmental and Sustainability Considerations
Eco-Friendly Options
Making your stone cladding project more environmentally responsible:
- Local sourcing: Choose stones quarried within 500 miles to reduce transportation impact
- Reclaimed stone: Consider salvaged stone from demolition projects
- Manufacturing processes: Some manufactured stone companies use recycled materials or energy-efficient production
- Low-VOC adhesives and sealers: Choose products with minimal off-gassing
- Life-cycle assessment: Natural stone typically has excellent longevity, reducing replacement frequency
Energy Efficiency Benefits
Properly installed stone cladding can improve building performance:
- Thermal mass: Stone absorbs heat slowly and releases it gradually, helping regulate temperature
- Insulation value: The installation system (including air gaps and backing materials) can improve R-value
- Reduced thermal bridging: Continuous exterior stone cladding can minimize heat transfer through framing
- Solar reflectance: Lighter colored stones reflect more solar energy, reducing cooling loads
Special Applications for Stacked Stone Cladding
Interior Feature Walls
Creating dramatic interior focal points:
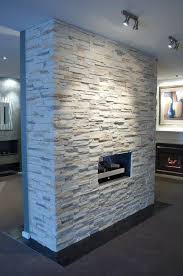
- Fireplace surrounds: Transform ordinary fireplaces with stone cladding
- Consider heat resistance of adhesives and sealers
- Follow proper clearances for combustible materials
- Kitchen backsplashes:
- Select thinner stones for kitchen applications
- Consider sealing for stain resistance
- Install with grout joints for easier cleaning
- Bathroom applications:
- Choose stones appropriate for wet environments
- Ensure proper waterproofing behind stones
- Consider mold-resistant mortars
Outdoor Living Spaces
Enhance outdoor areas with stone cladding:
- Outdoor kitchens:
- Select frost-resistant stones for freezing climates
- Ensure proper support for heavy stone applications
- Consider how stone coordinates with other outdoor materials
- Fire pit surrounds:
- Use appropriate high-temperature adhesives
- Select stones rated for heat exposure
- Allow for expansion with temperature changes
- Garden walls and planters:
- Incorporate drainage solutions
- Select stones resistant to soil staining
- Consider natural aging process in outdoor settings
Conclusion: Mastering How to Lay Stacked Stone Cladding
Installing stacked stone cladding requires careful planning, proper preparation, and attention to detail, but the results are worth the effort. By following this comprehensive guide, you’ll be equipped to create stunning stone installations that enhance your property’s beauty and value for decades to come.
Remember these key takeaways:
- Preparation is essential: Proper surface preparation prevents future problems
- Quality materials matter: Invest in good stone, appropriate adhesives, and proper tools
- Pattern planning pays off: Thoughtful stone arrangement creates natural-looking results
- Technique affects longevity: Correct installation methods ensure lasting performance
- Maintenance preserves beauty: Regular care extends the life of your stone cladding
Whether you’re tackling this project yourself or working with professionals, understanding the process of how to lay stacked stone cladding will help you achieve exceptional results that transform your space with timeless natural beauty.
Leave a Reply