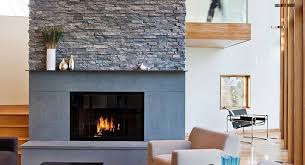
Cladding a wood chimney with stone veneer is a fantastic way to enhance your home’s curb appeal, add durability, and give your chimney a timeless, natural look without the heavy weight and cost of full stone. This guide will walk you through the process step-by-step, explaining key terms and tips to help you achieve a beautiful, long-lasting finish. Whether you’re a DIY enthusiast or planning to hire a professional, this article will make the process clear and approachable.
Table of Contents
- What Is Stone Veneer?
- Why Clad a Wood Chimney with Stone Veneer?
- Tools and Materials Needed
- Preparing Your Chimney for Stone Veneer
- Step-by-Step Installation Guide
- Important Considerations and Tips
- Maintenance and Longevity
- Frequently Asked Questions
What Is Stone Veneer?
Stone veneer is a thin layer of stone or stone-like material applied to surfaces to give the appearance of natural stone. It comes in two main types:
- Natural stone veneer: Thin slices of real stone, offering authentic texture and color.
- Manufactured stone veneer: Lightweight, made from concrete and pigments, designed to mimic natural stone’s look and feel.
Stone veneer is much lighter than full stone, making it ideal for cladding wood chimneys without adding excessive weight or requiring structural reinforcement7.
Why Clad a Wood Chimney with Stone Veneer?
Cladding your wood chimney with stone veneer offers several benefits:
- Improved aesthetics: Stone veneer adds a rustic, elegant look that can transform your chimney into a stunning focal point27.
- Durability: Stone veneer protects the chimney structure from weather elements like rain, snow, and temperature changes7.
- Cost-effective: It provides the look of real stone at a fraction of the cost and weight7.
- Versatility: Suitable for both new chimneys and remodeling existing ones7.
- Ease of installation: Compared to full stone, veneer is easier and quicker to install1.
Tools and Materials Needed
Before starting, gather the following:
- Stone veneer panels or individual stones
- Mortar mix (specifically for stone veneer)
- Metal lath (a mesh base for mortar adhesion)
- Weather-resistant barrier (WRB) or building paper
- Scratch coat materials (a base layer of mortar)
- Trowel and mortar hawk
- Level and measuring tape
- Hammer and nails or screws for lath installation
- Grout bag or pointing tools
- Safety gear (gloves, goggles, dust mask)
- Chimney flashing and cap (to prevent water infiltration)
Preparing Your Chimney for Stone Veneer
Proper preparation ensures your stone veneer adheres well and lasts long:
- Inspect the chimney structure: The chimney should be structurally sound, free of rot or damage.
- Apply a weather-resistant barrier (WRB): This protects the wood from moisture that can get behind the stone veneer7.
- Install metal lath: Attach metal lath over the WRB with nails or screws. This mesh provides a rough surface for the mortar to grip7.
- Apply a scratch coat: Spread a layer of mortar over the lath and scratch it with a comb-like tool to create grooves. This coat acts as a bonding surface for the stone veneer7.
Step-by-Step Installation Guide
Step 1: Plan Your Layout
- Lay out stones on the ground to plan the pattern and fit.
- Mix different sizes and shapes for a natural look.
- Measure your chimney to estimate the amount of veneer needed.
Step 2: Mix Mortar
- Follow manufacturer instructions to mix mortar to a thick but workable consistency.
Step 3: Apply Mortar to the Back of Stones
- Butter each stone with mortar on the back side to ensure a strong bond.
Step 4: Attach Stones to Chimney
- Press stones firmly onto the scratch coat, starting from the bottom.
- Use a level to keep stones even.
- Leave small gaps between stones for mortar joints.
Step 5: Fill Joints
- Use mortar to fill gaps between stones.
- Tool the joints to your desired finish (concave, flat, or raked).
Step 6: Clean Excess Mortar
- Wipe off mortar smudges before it dries to keep stones clean.
Step 7: Install Flashing and Cap
- Proper flashing around the chimney base and a cap on top prevent water damage5.
For a visual guide, videos like “How to Stone Veneer a Fireplace” by Ask This Old House provide excellent demonstrations1.
Important Considerations and Tips
- Heat resistance: Stone veneer is heat resistant but should not be directly exposed to open flames. Maintain clearance from the flue and firebox7.
- Moisture management: Proper WRB and flashing are critical to prevent water infiltration that can cause damage behind the veneer7.
- Professional help: If unsure, hiring a qualified mason ensures proper installation and reduces risks of cracking or detachment7.
- Weight considerations: Stone veneer is lightweight but still adds weight; confirm your chimney structure can support it.
- Maintenance: Regular inspections and cleaning will keep your chimney looking great and functioning well7.
Maintenance and Longevity
Stone veneer chimneys require minimal maintenance but benefit from:
- Annual inspections for cracks or loose stones
- Cleaning with a soft brush and mild detergent to remove dirt and moss
- Prompt repair of any damaged mortar joints
- Ensuring flashing and chimney cap remain intact to prevent water damage
With proper care, stone veneer can last decades, maintaining its beauty and protection7.
Frequently Asked Questions
Q: Can I install stone veneer myself?
A: Yes, with proper preparation and tools, many homeowners successfully install stone veneer themselves. However, complex chimneys or lack of experience may warrant professional help17.
Q: How much does stone veneer cost?
A: Costs vary by material and region but generally are much less than full stone installation. Manufactured stone veneer is typically more affordable than natural stone7.
Q: Is stone veneer safe around a wood-burning chimney?
A: Yes, if installed with proper clearance from heat sources and using heat-resistant materials, stone veneer is safe for chimneys7.
Stone veneer is an excellent way to upgrade your wood chimney, combining beauty, durability, and cost-effectiveness. With careful preparation and installation, you can enjoy a stunning stone-clad chimney that enhances your home for years to come.
Leave a Reply